Pencil Case Tutorial
It’s time to go Back-to-School! So I am here to help you prepare. Today I have prepared a quick and easy tutorial for you. We are going to make pencil cases. They are a cute way for your kids to express themselves. The cool thing is, you don’t have to use them as just pencil cases. They are great pouches for storage. So let’s get started!
Materials Needed:
-1/4 yard Printed fabric for Exterior
-1/4 yard Coordinated print fabric for Lining
-9” Zipper
-Pencil Case Pattern
We’ll begin by cutting our fabric pieces. Download the pencil case pattern located above. Print out the pdf pattern and cut out the stencil. Cut two pieces from both your exterior and lining fabrics.
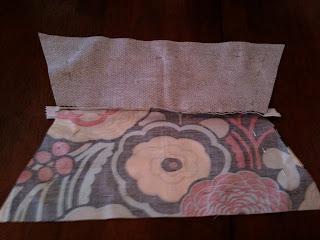
Place one piece of your lining right side up, with your shortest edge at the top. Place your zipper right side up, along the top edge of your lining. Make sure that your top edges are aligned. It should look like this:
Next, place one piece of your exterior fabric on top of the zipper. Match the raw edges up with your piece of lining. Then pin your fabric and zipper in place.
Using your zipper foot, sew along the top edge of your fabric to secure the zipper in place. Backstitch at both ends.
Pull your lining and exterior pieces back away from the zipper. Lay the remaining piece of lining right side up, with your shortest edge at the top. Place your zipper right side up, along the top edge of your lining. Make sure that your top edges are aligned. It should look like this:
Next, place one piece of your exterior fabric on top of the zipper. Match the raw edges up with your piece of lining. Then pin your fabric and zipper in place.
Using your zipper foot, sew along the top edge of your fabric to secure the zipper in place. Backstitch at both ends.
It should look like this so far:
Lining:
Exterior:
Pull your lining and exterior pieces back away from the zipper.
Unzip your zipper halfway. Make sure that you do this, so you will be able to turn your case right side out later.
Bring your case’s exterior pieces right sides together matching up raw edges. Pin them together.
Next, machine stitch around the edges of your entire case. Begin at the center of your lining pieces and leave a 3” opening so you can turn it right side out. Sew slowly when you reach the zipper and backstitch to reinforce.
Trim off excess pieces of your zipper at each end. With wrong sides out, press the four corners of both your lining and exterior pieces.
Measure 1” in from the tip of each corner. Sew across the tip of each case at the 1” mark. Backstitch at each end.
Trim the corners about ½” from the seam allowance. Almost finished! Turn your case right side out through the hole you left in the lining. Sew the gap shut using a top stitch.
Pull the outer case through the opening in the zipper. Then push the lining into the case’s exterior. Tada! You have just completed your pencil case. Pretty simple, right?
Enjoy!


No comments:
Post a Comment