Day Five of the Simple Sewing for Baby Book Review
Happy Thursday Everyone!
Today is our final day of tutorials from our first book review. So I thought for our last project we would make a little bath time set. Who doesn’t love bath time? These two projects come from Jansdotter’s Home Chapter. Today we are going to make a matching hooded towel and washcloth.
This is my first time working with terrycloth, so this could get interesting. We can learn together. I am really excited though, because I purchased some really cute Alexander Henry animal print fabric for this project. So let’s begin.
Materials Needed:
Wash Cloth:
-1/4 yard of terry cloth
-2 yard double fold bias tape or 1/3 yard of cotton fabric to make your own bias tape
-Matching thread
Hooded Towel:
-1 yard of terry cloth
-4 yards of double fold bias tape or 1/3 yard of cotton fabric (to make your own bias tape)
-Matching Thread
Washcloth:
We’ll start things off really simple, and begin by making your washcloths. Begin by cutting your terry cloth. Cut two (2) 8” x 8” squares out of your terrycloth.
Note: If you have decided to make your own bias tape, then review my tutorial on How to make Bias Tape.
Enclose the edges of the terrycloth in the bias tape. Make sure the edge of the terrycloth is flush with the center fold of the bias tape. Pin it in place.
At each corner, fold the bias tape into itself creating a 45 degree mitered corner. Pin them in place. It should look like this:
Now, machine stitch around all four sides. Sew close to the inside edge. Make sure you sew through all of the layers, especially when turning the corners.
Believe it or not….you’re finished! Wow, that was easier than I thought!
Now you have your set of washcloths.
Hooded Towel:
Now it’s time to finish the other half of out bath time set. Let’s move on to our hooded towel! We are going to cut two pieces from our terrycloth. First cut a 30” x 30” square.
Now we will begin assembling our towel. Begin by enclosing the long (16”) side of your triangle in the bias tape. Like with the washcloth, make sure the raw edge of the terrycloth is flush with the fold of the bias tape. Pin it in place.
Machine stitch along the edge of the bias tape. Make sure you go through all of the layers. Trim off each end of the bias tape.
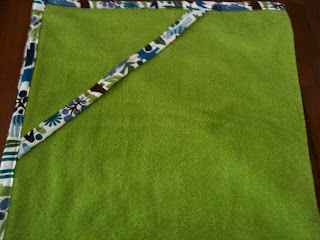
It should look like this when you are finished.....
Lay the triangle on one of the corners of the large square, with the bias edge going diagonally across the square. Make sure right sides are facing up on both pieces.
Machine baste the triangle in place along the two raw edges. Use a ¼” seam.
Enclose the raw edges of the square in the binding. Make sure the raw edge of the terrycloth is flush with the fold of the bias tape. Pin it in place.
To bind the corners, fold the bias over itself at a 45 degree mitered corner at each end. Pin them in place. Your corners should look like this:
Machine stitch around along the towel along the edges of the bias tape. Make sure you sew through all of the layers.
Guess what…..you have just finished your bath set. It turned out pretty great. Not bad for our first time. Feel like giving baby a bath right now, just to test them out? Just make sure you wash them before using them on baby.
I hope that you have enjoyed my firs book review. I know I enjoyed making these projects. And I know my friends are going to love these little gifts. Next month, I am going to be reviewing my next book. I am searching for a book that involves costume making. I think that it would be very fitting, since October is just around the corner. Wouldn’t you just love to say that you made your baby’s first Halloween costume?
Enjoy!


No comments:
Post a Comment