Thursday, September 2, 2010

Lunch Sack Tutorial

 
Handmade Lunch Sacks

Happy Thursday!  Back-to-School week is almost finished.  I hope that you have enjoyed making some cool new accessories for your children’s new school year.  Today we are going to make some cheery new handmade lunch sacks to carry the reusable snack bags we made yesterday. 


We’re going to make some lined lunch sacks that are easy to clean.  I use mine for trips to the park and our visits to Disneyland.  They are small, compact, and easily storable.  So let’s get started!


Materials Needed:
½ yard Printed Oilcloth
½ yard Utility Fabric
¼ yard Sticky Backed Velcro
Matching Thread


We will begin by cutting our fabric.  Cut two rectangular pieces from both your Oilcloth and Utility Fabric measuring 17” x 13”.


Next we are going to trim the corners of our fabric pieces.  Cut a 2 ½” square out of each bottom corner of your rectangular pieces.


Place your oilcloth pieces right sides together and match up the raw edges. Pin them in place.


Machine stitch down each side of your oilcloth and across the bottom, using a ½” seam.  Backstitch at both ends.  The square cutouts at your corners should be left open.


Time to close your corners.  Fold in bottom of bag bringing bottom seam and side seam together.  Match up the raw edges and pin bag bottom in place.


Machine stitch across each side using a ½” seam.  Then set it aside.


Now we’re going make your lining.  Place your utility fabric pieces right sides together and match up the raw edges. Pin them in place.  Machine stitch down each side of your utility and across the bottom, using a ½” seam.  Backstitch at both ends.  The square cutouts at your corners should be left open.


Time to close your corners.  Fold in bottom of bag bringing bottom seam and side seam together.  Match up the raw edges and pin bag bottom in place.  Machine stitch across each side using a ½” seam.


Turn your lining right side out and slip it inside of your oilcloth piece.  Right sides should be matched up. 


Match up your corners and raw edges and then pin them together at the top. 


Machine stitch along the top edge of your bag using a ½” seam, and backstitch at both ends.  Leave a 3” opening so you can turn your bag right side out.   


Using the 3” opening, turn your bag right side out.  Push your lining inside your bag’s exterior, matching up your corners and side seams.  Press the top edge with your iron.
Top-stitch along the edge of your bag using a ¼” seam allowance.  Backstitch at each end.


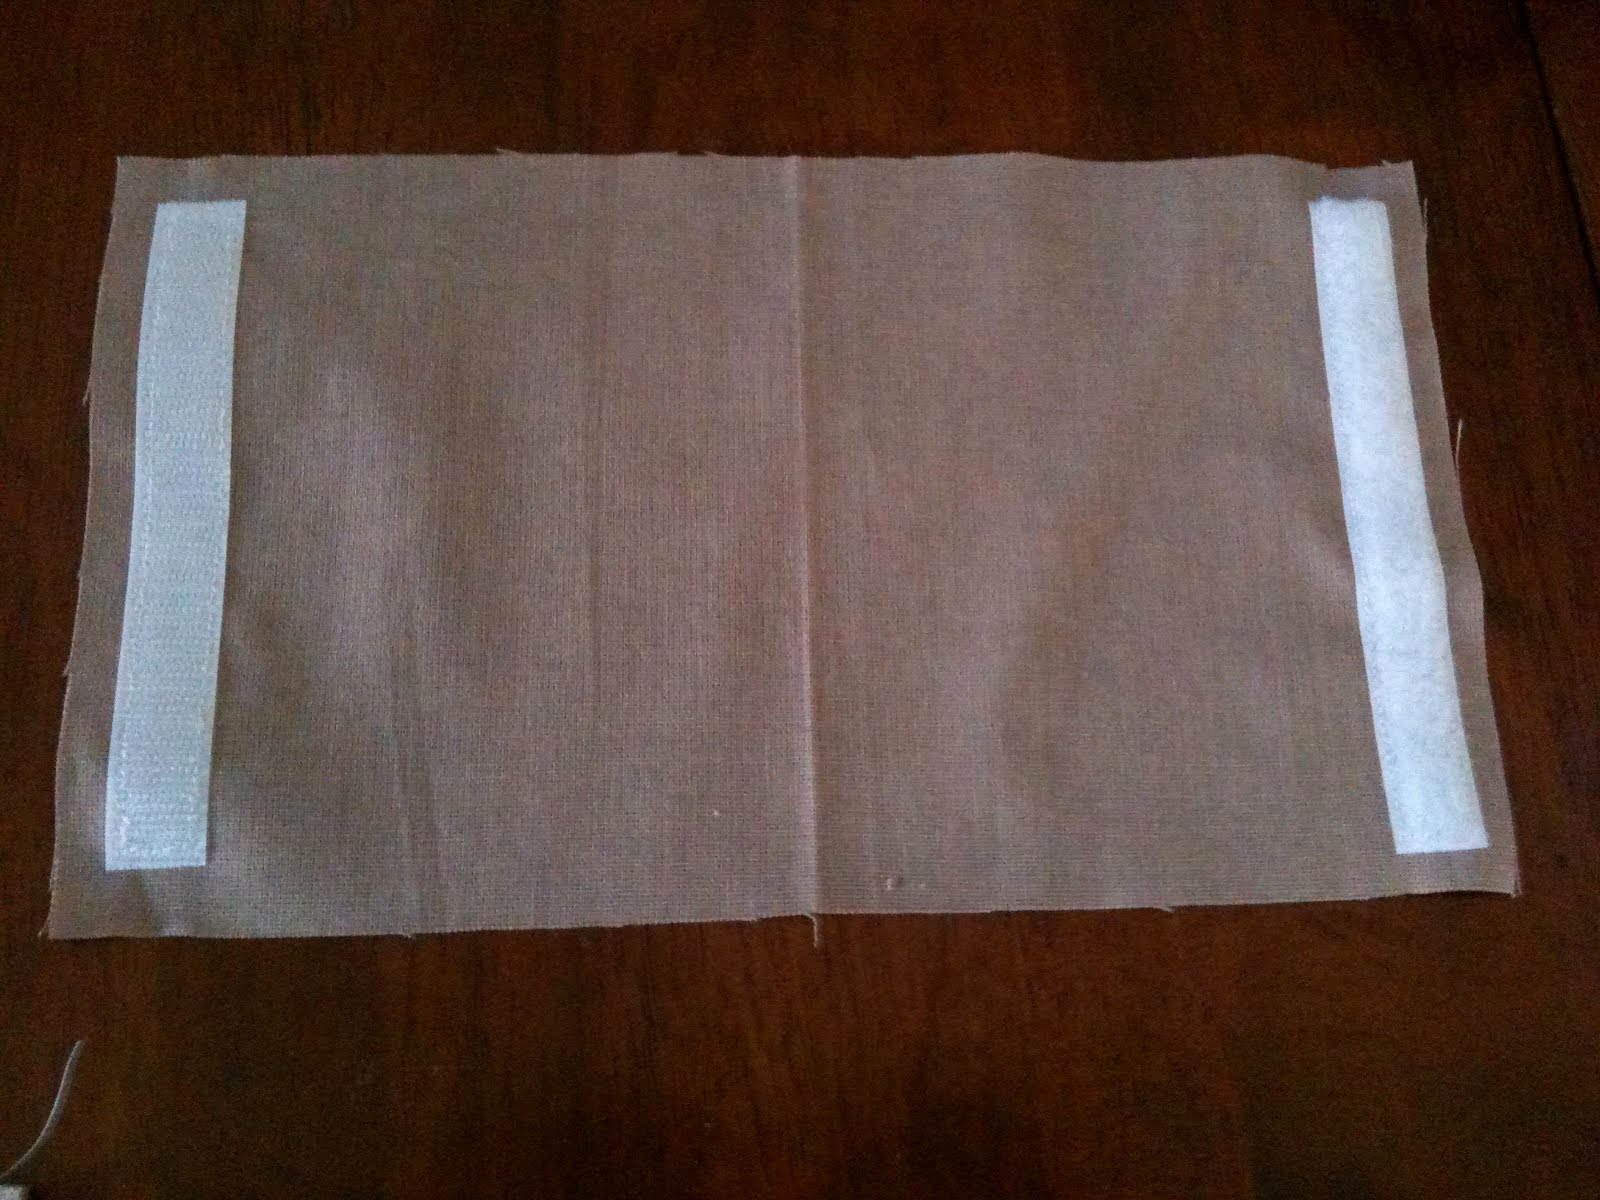
Almost finished!  We just need to add Velcro to our bag for a closure.  Fold the sides of your bag inward like a paper bag.  Place one piece of your Velcro just below the seam along your top edge.


Next, fold your bag’s top edge over twice, so your Velcro piece is touching the other side of your bag.  Should be about 3” down.  Attach the other piece of your Velcro.


Guess what…..we’re officially finished!  You have made your own lunch sack.  You will be able to send your kids off to school in style!


Enjoy!

Wednesday, September 1, 2010

Reusable Snack Bags


Reusable Snack Bag Tutorial

So Back-to-School week is under way.  I hope that you have found some of these recipes and tutorials have been helpful.  These next two tutorials are going to be geared towards making lunchtime more interesting.  Today we are going to make reusable snack bags.  I love these, because I hate Ziplock bags.  I buy the giant 3pack of Ziplock bags at Costco and use them for everything.  What bothers me about them is that you use them once and then throw them away.  If you hate throwing them out as much as I do, these little snack bags are the perfect solution!  So pick out some really cute printed fabric and let’s get to work.

These reusable bags are extremely simple and easy to make, so cut out multiple pieces so you don’t have to go backwards.  They make great gifts too!  Pick out some fun prints and put together a few sets for your nieces and nephews or your grandchildren.  They’ll be a hit.  I can promise you that.  Our finished bags will measure 5 ½” x 6 ½”.  You can adjust the size of the bags to make them bigger or smaller by changing the measurements of the fabrics you start with.


Materials Needed:
For a Set of 3
¼ yard Printed Fabric for the Exterior
¼ yard Utility Fabric or Osnaburg Fabric for the Lining
½ yard Sew-On Velcro
Matching Thread


Tip: When choosing which fabric you would like to choose for your lining, here’s a way to decide.  The Utility Fabric is best for foods that might melt or be sticky.  The utility fabric is easily cleaned by wiping the inside of your snack bag.  The Osnaburg Fabric is best for foods that crumble like crackers.  I recommend making your sets of snack bags using both the utility and the osnaburg fabric. 


We’ll begin by cutting our fabrics and Velcro.  These instructions are for making a set of three bags.  So if you would like to make more, just adjust your measurements accordingly.  Cut three rectangular pieces of your exterior fabric measuring 7” x 12.   Then cut three rectangular pieces of your lining fabric measuring 7” x 12.”  Cut three 6” pieces of Velcro.


On each piece of lining fabric, pin your pieces of Velcro on each end, about 1/2" in from the edge.


Machine stitch the Velcro to your fabric.  Stitch close to the edges on all four sides and backstitch at both ends.


Place your lining and exterior fabric right sides together.  Match up your raw edges and pin them in place.


Machine stitch around the edges of your fabric using a 1/4" seam, and backstitch at both ends.  Leave a 3” opening on one side, so you can turn you bag right side out.


Time to turn your bag right side out.  Trim your corners at a 45 degree angle and the pull your bag right side out.  Press your bag with an iron.


Machine stitch along the top edge of each end of your bags, about ¼” from the edges.


Almost finished!  Fold your bag in half lining sides together.  Match up your top edges and Velcro. 


Machine stitch the sides of your bags together.  Use a ¼” seam and backstitch at both ends.


Great news…….You are fininshed!  Now open up your snack bags and fill them up with your yummy snacks.  I told you they were easy!


Tomorrow we will be making Lunch Bags.  You’ll have something to put your reusable snack bags in.


Enjoy!

Tuesday, August 31, 2010

After School Snacks


We sometimes forget just how long a full day of school is.  Most kids are hungry when they get home from school and moms don't always have the time to put together anything special.  I have put together a few recipes that are quick and easy to whip up and are perfect for your kids to munch on.  I promise that they will be a hit with your kids.  I actually make a few of these to snack on whenever I am hard at work sewing or typing up my blog.  This first one is my favorite.  I actually double the recipe and store it in my handy dandy tupperware and hide it away in the cupboard.....so my husband won't eat it all.      


Motor Mouth Munchies Recipe
Yield: 4-1/2 quarts.


Ingredients
-1 pkg (18 oz) granola without raisins
-1 can (17 oz) mixed nuts
-1 pkg (15 oz) raisins
-1 pkg (14 oz) milk chocolate M&M's
-1 pkg (14 oz) peanut M&M's
-1 pkg (12-1/4 oz) Honey-Nut Cheerios
-1 pkg (8.9 oz) Cheerios


Directions
In a large bowl, combine all ingredients. Store in a covered container or large re-sealable plastic bags. 


Nutrition Facts: 3/4 cup equals 517 calories, 23 g fat (5 g saturated fat), 4 mg cholesterol, 334 mg sodium, 74 g carbohydrate, 9 g fiber, 13 g protein. 


This next recipe won't keep quite as long as the munchie snack mix.  But it's perfect if you like peanut butter and bananas.  It's a tasty treat that will provide your kids with a lot of energy.  


Nana Sticks Recipe
Yield: 6 servings.


Ingredients
-1/4 cup peanut butter
-2 Tbsp plus 1-1/2 tsp honey
-4-1/2 tsp brown sugar
-2 tsp milk
-3 medium firm bananas
-6 Popsicle sticks
-2 crunchy oat and honey granola bars, crushed


Directions
In a small saucepan, combine the peanut butter, honey, brown sugar and milk; cook until heated through, stirring occasionally.

Peel bananas and cut in half; insert a Popsicle stick into one end of each banana half. Spoon peanut butter mixture over bananas to coat completely. Sprinkle with granola.

Serve immediately or place on a waxed paper-lined baking sheet and freeze. 

Nutrition Facts: 1 serving (1 each) equals 353 calories, 13 g fat (2 g saturated fat), trace cholesterol, 183 mg sodium, 56 g carbohydrate, 4 g fiber, 7 g protein.
 

Here's another recipe that is great to store up on.  I like to double this recipe as well and store it in my pantry.  All you have to do is grab a bowl and fill it up and you're ready for study time!  


Popcorn Snack Mix Recipe
Yield: about 2-1/2 quarts


Ingredients
-8 cups popped popcorn
-2 Tbsp cinnamon-sugar
-1 Tbsp baking cocoa
-1 cup honey bear-shaped crackers
-1 cup broken thin pretzel sticks
-1/2 cup milk chocolate M&M's


Directions
Place popcorn in a large bowl.

In a small bowl, combine cinnamon-sugar and cocoa.

Sprinkle cinnamon mix over popcorn and toss to coat. Stir in graham snacks, pretzels and M&M's.

Store in an airtight container. 


What's to come.....

So now you're set!  You have three new recipes to add to your collection.  They are easy to prep and they are delicious and healthy treats for your little ones to snack on.  Thursday I will have a few more recipes for you.  And tomorrow, I will be showing you how to make Reusable Snack Bags.  So you can cut down on the plastic baggies.  And Thursday, we'll be making Lunch Bags.  So get ready.


Enjoy!

Book Bag Tutorial


Book Bag Tutorial


So this is one of the first things I ever learned how to make back when I was a kid. These little book bags are incredibly simple to make and they are super cute! They are reversible, so you have two bags in one! How great is that? You can adjust the sixe to fit your needs. But for the time being, today we are going to make a cute little book bag for your kids to take to the library or on a field trip. You can come up with so many uses for these bags. You’re going to love this one, I promise!


Materials Needed:
-1/2 yard Printed Fabric for exterior & straps
-3/4 yard Coordinated Print Fabric for trim & lining


We’ll begin by cutting all of the pieces needed for this project.
From the ½ yard of fabric, cut:
2 – 12” x 12” squares
2 – 2 ½” x 20” strips
From the ¾ yard of fabric, cut:
2 – 5” x 12” rectangles
2 – 12” x 16” rectangles


Now we’re ready to begin! We’ll start with your two 12” squares and two 5” x 12” rectangles. Place one square right side up on your workspace. Match one rectangular piece with top edge of your square, right sides together. Match up your raw edges and then pin them in place. Repeat these steps with your other two pieces.


Machine stitch your pieces together using a 1/2 “ seam allowance.


Press your seams open on both exterior panels.


Now place your exterior panels right sides together. Make sure you match up your raw edges. Pin them in place.


Machine stitch around the two sides and the bottom of your exterior panels. Leave your top edge open.


Clip the bottom corners at an angle. Then turn the piece right side out. And set it aside.


For the lining, place your two 12” x 16” pieces right sides together. Pin them in place.


Machine stitch around the two sides and the bottom of your lining panels. Leave your top edge open. Clip the bottom corners at an angle. And set it aside.


Now we’re going to assemble the straps for your book bag. Fold your straps in half lengthwise with right sides together. Press them with an iron.


Next fold the raw edges of your straps inward a ¼” and press with your iron.


Machine stitch around all four sides of your straps.


They should look like this when you have finished:


Now we’re going to attach your straps to the exterior of the bag. Mark 2” in from the side seams of the bag on both sides. At these 2” marks, pin your straps to the exterior of the bag. Match up the raw edges. Make sure that your straps aren’t twisted before you pin them in place.


With right sides together, slip your exterior piece inside of your lining piece. Match up your side seams and straps. Then pin them in places.


Beginning on the inside of one set of straps, machine stitch around the top edge of your bag. Backstitch at each side seam, strap, and at both ends. Leave an opening 3” wide so you can turn your bag right side out.


Almost finished! Turn your bag right side out through the opening.


Next, push the lining inside the exterior of the bag. Then press the top edge flat.


Machine stitch around the top edge of your bag. This will seal your opening and finish your bag.


Guess what, we’re finished! Now you have a fantastic little book bag to take to the library.


Enjoy!